
Всем привет!
На днях сделал очередную реинкарнацию часов, в предыдущей записи есть описание технологий.
В этот раз все построено на той же самой базе.
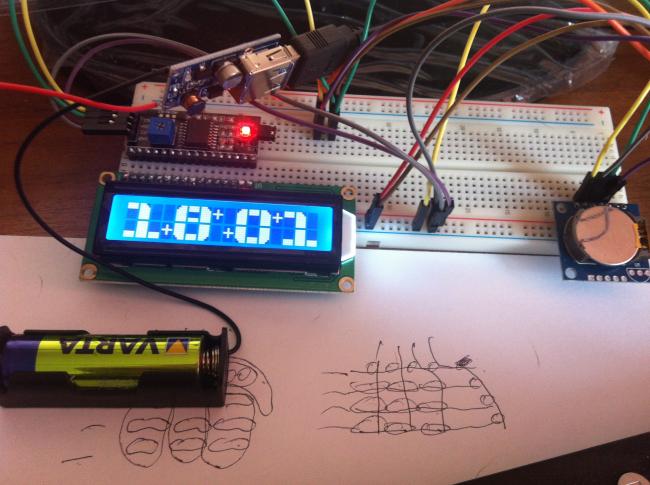
Погуглив, нашел на форуме arduino.cc описание как сделать большие цифры на символьном экранчике.
Все то же самое — пользовательские символы. Сами цифры рисуются в отдельных функциях для каждой цифры. Код привожу ниже.
// Date and time functions using a DS1307 RTC connected via I2C and Wire lib

#include <Wire.h>
#include "RTClib.h"
#include <LiquidCrystal_I2C.h>
RTC_DS1307 rtc;
LiquidCrystal_I2C lcd(0x27,16,2);  // set the LCD address to 0x27 for a 16 chars and 2 line display

byte LT[8] =
{


  B00111,
  B01111,
  B11111,
  B11111,
  B11111,
  B11111,
  B11111,
  B11111
};
byte UB[8] =
{
  B11111,
  B11111,
  B11111,
  B00000,
  B00000,
  B00000,
  B00000,
  B00000
};
byte RT[8] =
{

  B11100,
  B11110,
  B11111,
  B11111,
  B11111,
  B11111,
  B11111,
  B11111
};
byte LL[8] =
{


  B11111,
  B11111,
  B11111,
  B11111,
  B11111,
  B11111,
  B01111,
  B00111
};
byte LB[8] =
{
  B00000,
  B00000,
  B00000,
  B00000,
  B00000,
  B11111,
  B11111,
  B11111
};
byte LR[8] =
{


  B11111,
  B11111,
  B11111,
  B11111,
  B11111,
  B11111,
  B11110,
  B11100
};
byte MB[8] =
{
  B11111,
  B11111,
  B11111,
  B00000,
  B00000,
  B00000,
  B11111,
  B11111
};
byte block[8] =
{
  B11111,
  B11111,
  B11111,
  B11111,
  B11111,
  B11111,
  B11111,
  B11111
};
// loop counter
int count = 0;


void setup () {
  Serial.begin(57600);
  Wire.begin();
  rtc.begin();
  lcd.init();                      // initialize the lcd
  lcd.backlight();
  lcd.home();

  lcd.createChar(0,LT);
  lcd.createChar(1,UB);
  lcd.createChar(2,RT);
  lcd.createChar(3,LL);
  lcd.createChar(4,LB);
  lcd.createChar(5,LR);
  lcd.createChar(6,MB);
  lcd.createChar(7,block);

  // sets the LCD's rows and colums:
  lcd.clear();


  if (! rtc.isrunning()) {
    Serial.println("RTC is NOT running!");
    // following line sets the RTC to the date & time this sketch was compiled
    // rtc.adjust(DateTime(__DATE__, __TIME__));
  }
}


void custom0(int x)
{ // uses segments to build the number 0

  lcd.setCursor(x,0); // set cursor to column 0, line 0 (first row)
  lcd.write(0);  // call each segment to create
  lcd.write(1);  // top half of the number
  lcd.write(2);
  lcd.setCursor(x, 1); // set cursor to colum 0, line 1 (second row)
  lcd.write(3);  // call each segment to create
  lcd.write(4);  // bottom half of the number
  lcd.write(5);
}

void custom1(int x)
{
  lcd.setCursor(x,0);
  lcd.write(1);
  lcd.write(2);
  lcd.print(" ");
  lcd.setCursor(x,1);
  lcd.write(4);
  lcd.write(7);
  lcd.write(4);
}

void custom2(int x)
{
  lcd.setCursor(x,0);
  lcd.write(6);
  lcd.write(6);
  lcd.write(2);
  lcd.setCursor(x, 1);
  lcd.write(3);
  lcd.write(4);
  lcd.write(4);
}

void custom3(int x)
{
  lcd.setCursor(x,0);
  lcd.write(6);
  lcd.write(6);
  lcd.write(2);
  lcd.setCursor(x, 1);
  lcd.write(4);
  lcd.write(4);
  lcd.write(5);
}

void custom4(int x)
{
  lcd.setCursor(x,0);
  lcd.write(3);
  lcd.write(4);
  lcd.write(7);
  lcd.setCursor(x, 1);
  lcd.print(" ");
  lcd.print(" ");
  lcd.write(7);
}

void custom5(int x)
{
  lcd.setCursor(x,0);
  lcd.write(3);
  lcd.write(6);
  lcd.write(6);
  lcd.setCursor(x, 1);
  lcd.write(4);
  lcd.write(4);
  lcd.write(5);
}

void custom6(int x)
{
  lcd.setCursor(x,0);
  lcd.write(0);
  lcd.write(6);
  lcd.write(6);
  lcd.setCursor(x, 1);
  lcd.write(3);
  lcd.write(4);
  lcd.write(5);
}

void custom7(int x)
{
  lcd.setCursor(x,0);
  lcd.write(1);
  lcd.write(1);
  lcd.write(2);
  lcd.setCursor(x, 1);
  lcd.print(" ");
  lcd.print(" ");
  lcd.write(7);
}

void custom8(int x)
{
  lcd.setCursor(x,0);
  lcd.write(0);
  lcd.write(6);
  lcd.write(2);
  lcd.setCursor(x, 1);
  lcd.write(3);
  lcd.write(4);
  lcd.write(5);
}

void custom9(int x)
{
  lcd.setCursor(x,0);
  lcd.write(0);
  lcd.write(6);
  lcd.write(2);
  lcd.setCursor(x, 1);
  lcd.print(" ");
  lcd.print(" ");
  lcd.write(7);

}

//void clearnumber(int x)
//{ // clears the area the custom number is displayed in
// lcd.setCursor(x,0);
// lcd.print("   ");
// lcd.setCursor(x,1);
// lcd.print("   ");
//}


void loop () {

  digitalClockDisplay();
  delay(1000);

}


void digitalClockDisplay(){
  // digital clock display of the time
  DateTime now = rtc.now();

  printDigits(now.hour()/10,0);
  printDigits(now.hour()%10,4);

  printDigits(now.minute()/10,9);
  printDigits(now.minute()%10,13);

  // lcd.setCursor(7, 1);
  //  lcd.print(now.second()/10);
  //   lcd.print(now.second()%10);


  if (now.second()%10%2==0){
    lcd.setCursor(7, 0);
    lcd.print("+ ");
    lcd.setCursor(7, 1);
    lcd.print(" +");
    lcd.setCursor(3, 1);
    lcd.print("+");
    lcd.setCursor(12, 0);
    lcd.print("+");
    lcd.setCursor(3, 0);
    lcd.print(" ");
    lcd.setCursor(12, 1);
    lcd.print(" ");
  }
  else
  {
    lcd.setCursor(7, 0);
    lcd.print(" +");
    lcd.setCursor(7, 1);
    lcd.print("+ ");
    lcd.setCursor(3, 0);
    lcd.print("+");
    lcd.setCursor(12, 1);
    lcd.print("+");
    lcd.setCursor(3, 1);
    lcd.print(" ");
    lcd.setCursor(12, 0);
    lcd.print(" ");
  }
  //нарисовали двоеточие

}


void printDigits(int digits, int x){
  // utility function for digital clock display: prints preceding colon and leading 0

  switch (digits) {
  case 0:
    custom0(x);
    break;
  case 1:
    custom1(x);
    break;
  case 2:
    custom2(x);
    break;
  case 3:
    custom3(x);
    break;
  case 4:
    custom4(x);
    break;
  case 5:
    custom5(x);
    break;
  case 6:
    custom6(x);
    break;
  case 7:
    custom7(x);
    break;
  case 8:
    custom8(x);
    break;
  case 9:
    custom9(x);
    break;

  }


}
3 комментария на «“Arduino LCD 16×2 I2C RTC 1307 — часы с большими цифрами, простой код для новичков”»
А как время выставлять?
Упустил коммент установки %)
Это ж РТЦ, поставил программно и забыл))
А вообще я сейчас кнопками выставляю часы минуты секунды увеличение на единицу вверх по циклу.