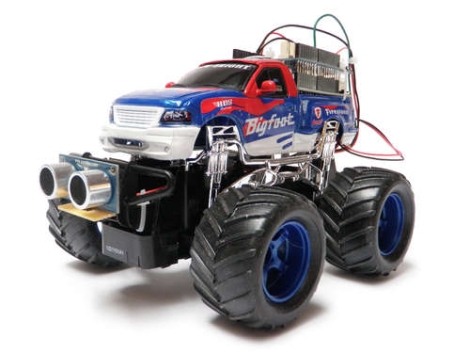
Переделать радиоуправляемую машинку в робота, действительно легко — достаточно использовать Arduino, мотор-шилд и какой-нибудь датчик (например, инфракрасный или ультразвуковой дальномер).
RC Car to Robot
пример скетча:
/*
RC Car to Robot Conversion
by Randy Sarafan

Used to convert an RC car into a robot that uses a PING sensor to avoid obstacles,
and an Arduino motor shield for motor control.

For more information see:
http://www.instructables.com/id/RC-Car-to-Robot/

Built atop Ping example code by Tom Igoe
*/

// this constant won't change.  It's the pin number
// of the sensor's output:
const int pingPin = 7;

void setup() {

  //establish motor direction toggle pins
  pinMode(12, OUTPUT); //drive motor -- HIGH = forwards and LOW = backwards
  pinMode(13, OUTPUT); //turn motor -- HIGH = left and LOW = right

  //establish motor brake pins
  pinMode(9, OUTPUT); //brake (disable) the drive motor
  pinMode(8, OUTPUT); //brake (disable) the turn motor

  //Turns brake off for drive motor
  digitalWrite(9, LOW);

  //Turns brake on for turn motor
  digitalWrite(8, HIGH);

  //Sets initial speed of drive motor
  analogWrite(3, 200);

  //Sets initial direction of drive motor
  digitalWrite(12, HIGH);
}

void loop()
{
  // establish variables for duration of the ping,
  // and the distance result in inches and centimeters:
  long duration, inches, cm;

  // The PING))) is triggered by a HIGH pulse of 2 or more microseconds.
  // Give a short LOW pulse beforehand to ensure a clean HIGH pulse:
  pinMode(pingPin, OUTPUT);
  digitalWrite(pingPin, LOW);
  delayMicroseconds(2);
  digitalWrite(pingPin, HIGH);
  delayMicroseconds(5);
  digitalWrite(pingPin, LOW);

  // The same pin is used to read the signal from the PING))): a HIGH
  // pulse whose duration is the time (in microseconds) from the sending
  // of the ping to the reception of its echo off of an object.
  pinMode(pingPin, INPUT);
  duration = pulseIn(pingPin, HIGH);

  // convert the time into a distance
  inches = microsecondsToInches(duration);

  //
  //if objects are less than 12 inches away
  //the robot reverses and turns to the right
  //for 2 seconds
  //

  if (inches < 12){

    //brake drive motor and pause 1/10 second
    digitalWrite(9, HIGH);
    delay(100);

    //
    //setting turn motor
    //

    //turn off brake for turn motor
    digitalWrite(8, LOW);

    //set turn motor direction
    digitalWrite(13, HIGH);

    //activate turn motor
    analogWrite(11, 255);

    //
    //setting drive motor
    //

    //turn off brake of drive motor
    digitalWrite(9, LOW);

    //set drive motor backwards direction
    digitalWrite(12, LOW);

    //activate the drive motor
    analogWrite(3, 200);


    //backup for 2 seconds
    delay(2000);

    //
    //stopping
    //

    //brake both motors
    digitalWrite(8, HIGH);
    digitalWrite(9, HIGH);


  }

  //
  //when nothing is within 12"
  //the robot simply drives forwards
  //

  else{

    //
    //Setting drive motor
    //

    //set drive motor forward direction
    digitalWrite(12, HIGH);

    //turn off brake of drive motor
    digitalWrite(9, LOW);

    //activate drive motor
    analogWrite(3, 200);


  }

  delay(100);
}

long microsecondsToInches(long microseconds)
{
  // According to Parallax's datasheet for the PING))), there are
  // 73.746 microseconds per inch (i.e. sound travels at 1130 feet per
  // second).  This gives the distance travelled by the ping, outbound
  // and return, so we divide by 2 to get the distance of the obstacle.
  // See: http://www.parallax.com/dl/docs/prod/acc/28015-PING-v1.3.pdf
  return microseconds / 74 / 2;
}
Ссылки
RC Car to Robot
По теме
Ультразвуковой датчик измерения расстояния HC-SR04
Arduino
Arduino, термины, начало работы
КМБ для начинающих ардуинщиков
Состав стартера (точка входа для начинающих ардуинщиков)

0 комментариев на «“Переделать радиоуправляемую машинку в робота”»
Ну, всё-таки роботом называть такую конструкцию не совсем верно 🙂 Хотя фиг знает, определение расплывчато. У меня тож машинка примерно такая же валяется, думал её как шасси использовать (стандартный этап всех ардуинщиков). Но пришёл к выводу что машинка шибко скоростная, а так как планировалось получать картинку с ip-камеры на шасси (с задержкой, само собой), то скорость тут только мешает. В итоге обзавёлся распространёнными недорогими гусеничными шасси. И вот что получилось: (ссылки на тег, несколько записей идут подряд)
шасси номер один —
шасси номер два —
Первая тележка с ультразвуковыми датчиками, очень удобные они. Но вторую датчики вешать пока не стал.
Кстати, ультразвуковой дальномер можно раздраконить — отпаять излучатель и приёмник и вынести из за пределы платы, нарастив проводочками. Главное полярность не перепутать и тип (на задней стороне излучателя и приёмника написано T или R — трансивер или ресивер). Таким образом не обязательно снаружи вешать всю плату дальномера, достаточно только датчики вынести. Опробовал на тележке — всё норм, точность измерения не теряется.