
В практикуме программирования Arduino/CraftDuino уже рассматривали работу с фоторезистором.
А вот что можно сделать если использовать сразу 4 фоторезистора, светодиод и простой отражатель из белого картона:
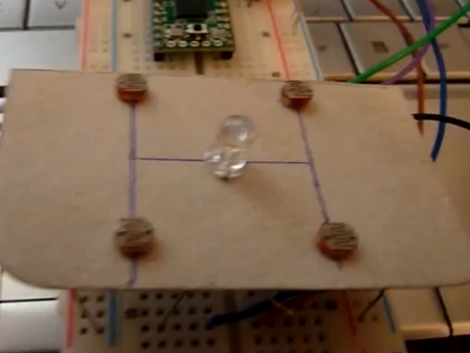
Теперь, если поднести к датчику руку, то от неё будет отражаться свет светодиода и фиксироваться фоторезисторами. Фоторезисторы подключаются к аналоговым входам Arduino/CraftDuino и их показания можно использовать для управления курсором, вместо обычной компьютерной мышки.
код скетча для Arduino/CraftDuino:
int ledPin = 0; // Led Output pin
int inPins[] = {0,1,2,3}; // Analog Input pins for the 4 photoresistors
int bufferPast[] = {0,0,0,0}; // Motion detector buffer. Not used.
int bufferPresent[] = {0,0,0,0}; // Motion detector buffer. Not used.
int calibated[] = {0,0}; // Store the X and Y bias. => Ambiant light noise. used to remove the light noise in the reading.
int is_calibrated = 0; // 0 = Not calibrated yet. 1 = calibrated. Set to 1 by the calibrate() function.
void setup() {
pinMode(ledPin, OUTPUT);
Serial.begin(9600);
}
void loop() {
if (is_calibrated == 0) {
blinkIt(5,200); // Blink the led 5 time slowly to let the user know the calibration is going to start
Serial.println("---------------");
Serial.println("Calibrating...");
digitalWrite(ledPin, HIGH); // light the LED
calibrate(); // Calibrate the sensor. The X and Y bias are stored in calibated[]
Serial.println("Calibration Done!");
Serial.print("x bias:");
Serial.print(calibated[0]);
Serial.print("\t");
Serial.print("y bias:");
Serial.print(calibated[1]);
Serial.println("");
Serial.println("---------------");
blinkIt(10,100); // Blink 10 time fast to let the user know the calibration is done
} else {
digitalWrite(ledPin, HIGH); // Light the LED
Serial.print(x_vector_motion());
Serial.print(";");
Serial.print(y_vector_motion());
Serial.println("");
Mouse.move(x_vector_motion()/10, y_vector_motion()/10); // Move the mouse according to the sensor's reading. Values divided by 10 to reduce the speed.
delay(20);
}
}
// Blink n times with a delay of d ms
void blinkIt(int n, int d) {
for (int i=0;i
0 комментариев на «“Датчик на базе светодиода и черырёх фоторезисторов”»
не могли бы выложить схему этого устр-ва.