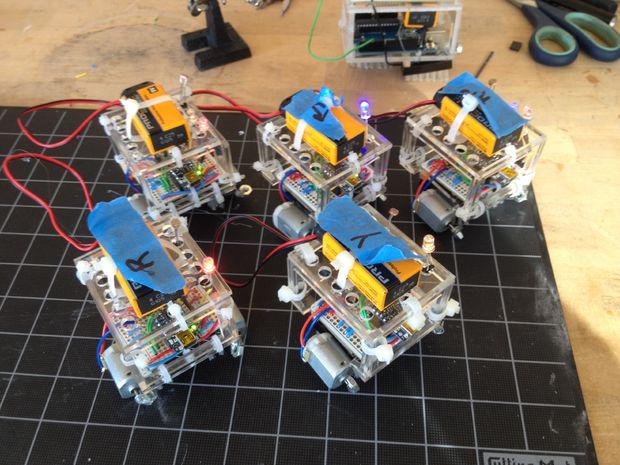
Для создания такого робота потребуются:
* пара щёток,
* два самодельных вибромотора,
* миниатюрная версия контроллера Arduino,
* два фоторезистора,
* два биполярных NPN-транзистора (PN2222), для управления двигателями,
* цветные светодиоды, для отслеживания ботов при помощи системы компьютерного зрения,
* немного мелочёвки (резисторы, провода и т.п.)
Программы для swarm-роботов:
bristleTHINKER.ino
//  This definition runs an early version of the script. With this script, the robot will occasionally check how
//  much light there is, and then turn left or right based on how much light it sees. The robot I was working with
// had one photocell mounted on top and one mounted on this bottom, instead of to the left and right on the chassis.

    // LED
    int LED = 4;

    //Photo Resistors
    int photocellUPPER = 1; //Ambient photocell sensor - Upper Sensor
    int photocellLOWER = 3; //Turnaround photocell sensor - Lower Sensor
    int photocellUPPERreading;
    int photocellLOWERreading;

    //Motors
    int leftMOTORpin = 0; // connect leftMotor to pin 0 (PWM pin)
    int rightMOTORpin = 1; // connect rightMotor to pin 1 (PWM pin)
    int MOTORspeed;


// in the setup, we're just going to turn on the LED's, which I had setup in pin 4 for this robot
void setup() {

   analogWrite (LED, 255);

}

void loop(void) {

// First off, we'll make a reading of the ambient light.

   photocellUPPERreading = analogRead(photocellUPPER);


// Now we'll remap the photocellReading values to a range of values that work for our motors.

    MOTORspeed = map(photocellUPPERreading, 0, 1023, 0, 255);

// Here's where the actual behavior is executed.
// In this definition, the robot will go right if it's bright out, and left if it's dark.
// After a second of this behavior, it then goes straight for two seconds.
// This behavior makes it look like they're always "thinking" about what to do next,
// hence the name "bristleTHINKER".

    analogWrite(rightMOTORpin, MOTORspeed);
    analogWrite(leftMOTORpin, 255 - MOTORspeed);

    delay(1000);

    analogWrite(rightMOTORpin, 255);
    analogWrite(leftMOTORpin, 255);

    delay(2000);

  }
bristleSEEKER.ino
    // LED
    int LED = 4;

    //Photo Resistors
    int photocellLEFT = 1; //left facing photocell sensor
    int photocellRIGHT = 3; //Turnaround photocell sensor

    //Motors
    int leftMOTORpin = 0; // connect leftMotor to pin 0 (PWM pin)
    int rightMOTORpin = 1; // connect rightMotor to pin 1 (PWM pin)
    int rightMOTORspeed;
    int leftMOTORspeed;
    int leftMOTORratio;
    int rightMOTORratio;


void setup() {

        analogWrite (LED, HIGH);
      }

void loop(void) {

//here we define the speed of the left and right motors as the ratio of brightness between the
//two photocells. As the photocell on one side gets brighter, it slows down, turning
//the robot in that direction.

        rightMOTORratio = (analogRead(photocellLEFT) / analogRead(photocellRIGHT));
        leftMOTORratio = (analogRead(photocellRIGHT) / analogRead(photocellLEFT));

//this part turns our ratio into a usable speed for our motors

        leftMOTORspeed = (leftMOTORratio * 255);
        rightMOTORspeed = (rightMOTORratio * 255);

//and this writes that value to the pin

        analogWrite(leftMOTORpin, leftMOTORspeed);
        analogWrite(rightMOTORpin, rightMOTORspeed);


  }
Видео работы:
Ссылки
BristleSwarm: Explorations into Swarm Robotics
По теме
Kilobot — роевые микророботы
Более 1000 роевых микророботов научили выстраивать сложные фигуры
Swarmanoid
Cамоорганизация роботов без алгоритмов
Arduino
Ардуино что это и зачем?
Arduino, термины, начало работы
КМБ для начинающих ардуинщиков
Состав стартера (точка входа для начинающих ардуинщиков)
